Blending in a computational environment is understood as the mixture of color information between two elements. Photoshop and other editing software typically use the same names and behaviors for blending modes, as these modes are derived from logical statements and mathematical equations. This consistency ensures that users can expect similar results when using blending modes across different software platforms.
Working in different modes in Photoshop (such as 32-bit or Lab color space), will make some blending modes unavailable, so in this article I will describe the blending modes in 8-bit and 16-bit projects, referring to the bottom layer as the base layer and the layer on which the blending mode is applied to as the active layer.
Table of contents
Blending modes categories
For layers, there are 6 categories of blending modes.
Normal – do not change pixel interpretation, only their visibility
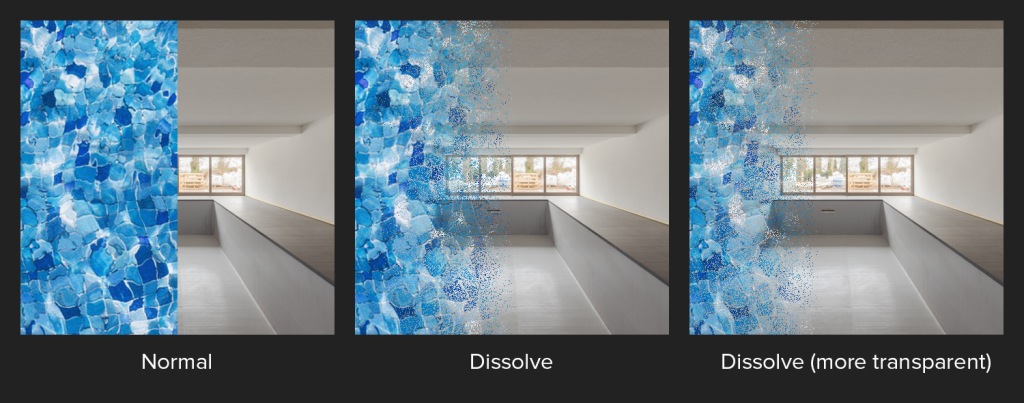
- Normal – all new layers, Fill or Adjustment layers will be automatically set to this blending mode. Without changing the opacity or fill of the active layer, the covered parts of the base layer won’t be visible.
- Dissolve – based on the active layer’s transparency it randomly displays pixels. The more transparent an area is, the less pixels will appear.
Darken – compare the base and active layers, retaining only the darker pixels and blending away bright areas
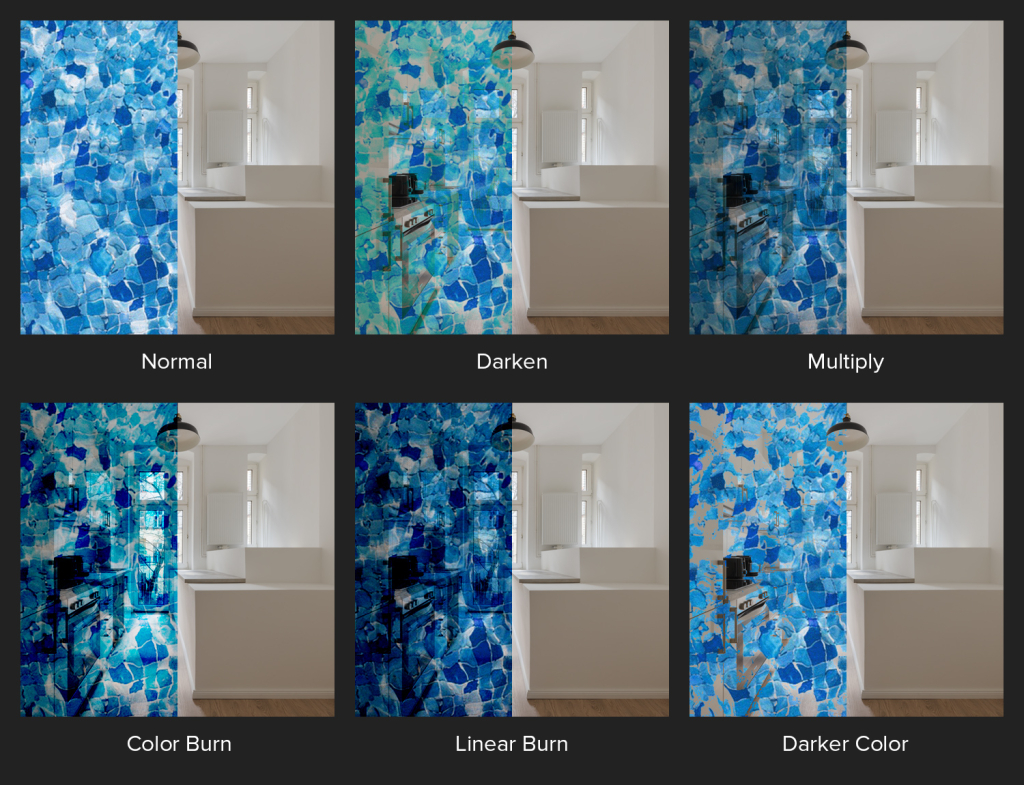
- Darken – if the pixels of the active layer are darker than the base layer, they are kept visible, while brighter pixels are replaced with the darker tones of the base layer. This effect is applied to each of the RGB channels.
- Multiply – multiplies the luminance values of each channel from the active and base layers, intensifying dark tones and always resulting in a much darker image.
- Color Burn – results in more pronounced darks than Multiply with excessively saturated midtones and reduced highlights.
- Linear Burn – darker than Multiply, less saturated than Color Burn.
- Darker Color – compares each pixel and shows the darker of the two; in contrast to Darken, which darkens each color channel separately, applies its effect on the composite RGB channel.
Lighten – compare the base and active layers, favoring the lighter values to produce brighter results
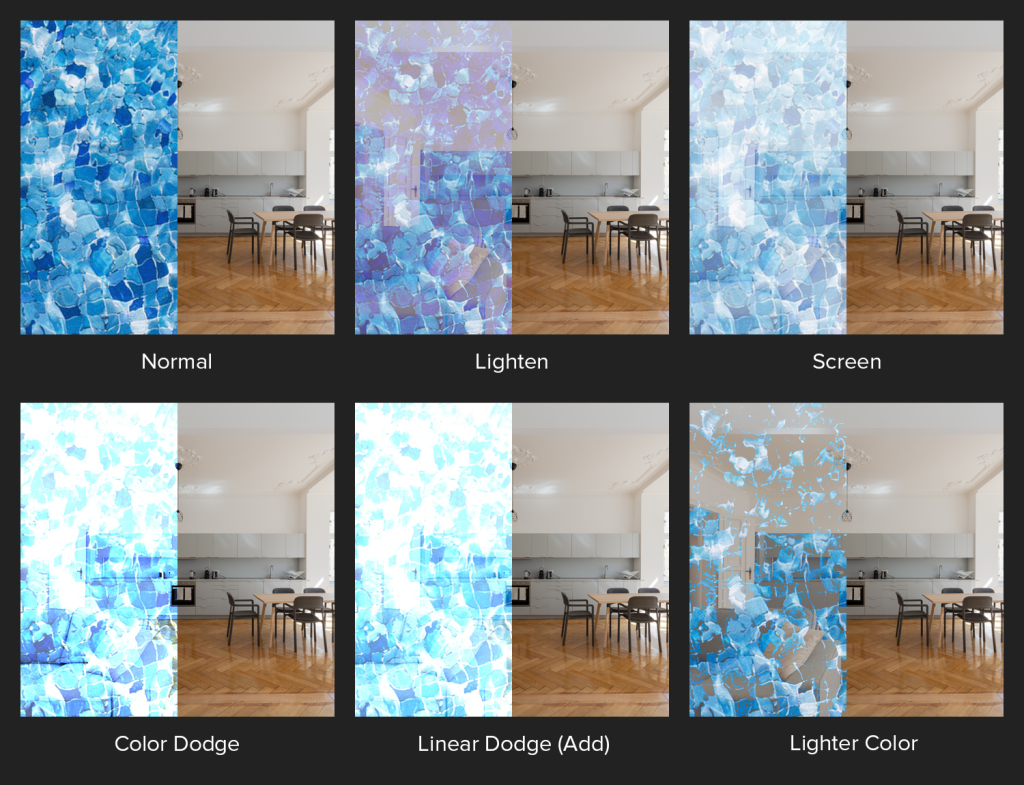
- Lighten – if the pixels of the active layer are brighter than the base layer, they are kept visible, while darker pixels are replaced with the brighter tones of the base layer. Like Darken, this effect is applied to each of the RGB channels.
- Screen – inverts, multiplies and then inverts again the luminance values of each channel from the active and base layers, resulting in the removal of dark areas and providing a smoother transition than Lighten.
- Color Dodge – the results are brighter than with the Screen blending mode, with saturated midtones and overexposed highlights.
- Linear Dodge (Add) – brighter than Color Dodge but less saturated, as it sums the pixel values of the two layers.
- Lighter Color – compares each pixel and shows the brighter of the two; in contrast to Lighten, which brightens each color channel separately, applies its effect on the composite RGB channel.
Contrast – blending modes in this group intensify highlights and shadows using a combination of the blending modes in the Darken and Lighten categories, except for Hard Mix. They blend both layers and are ideal for detail- and texture-related work.
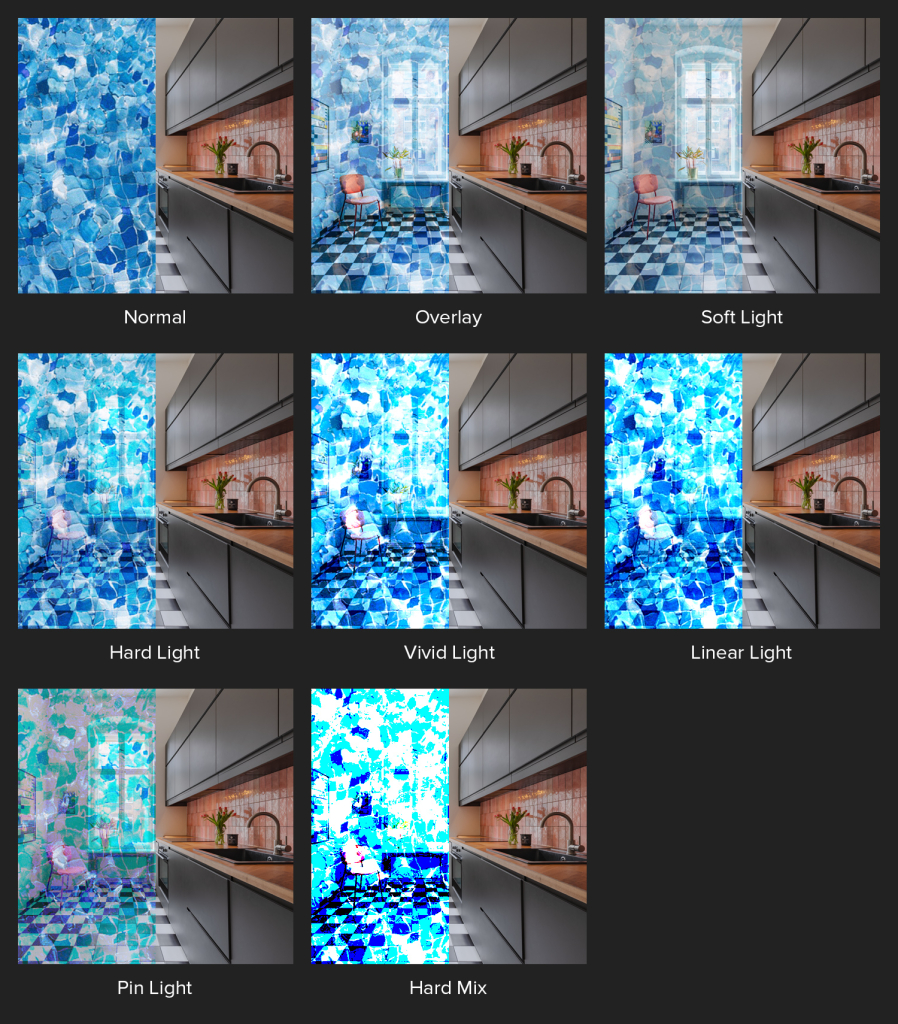
- Overlay – combines the Multiply (for darker pixels) and Screen (for brighter pixels) blending modes, applying them at half strength.
- Soft Light – a more complicated implementation of Overlay, which offers softer results.
- Hard Light – combines the Linear Burn (for darker pixels) and Linear Dodge (for brighter pixels) blending modes, applying them at full strength, revealing more contrast than the Overlay blending mode.
- Vivid Light – combines the Color Burn (for darker pixels) and Color Dodge (for brighter pixels) blending modes, applying them at half strength, resulting in more contrast than Hard Light.
- Linear Light – combines the Linear Burn (for darker pixels) and Linear Dodge (for brighter pixels) blending modes, applying them at full strength. The texture layer needs to be set to this blending mode when working with frequency separation.
- Pin Light – combines the Darken (for darker pixels) and Lighten (for brighter pixels) blending modes. If the dark pixels on the active layer are darker than those on the base layer, and the light pixels on the active layer are lighter than those on the base layer, both groups remain visible, while the rest of the midtones are hidden from the final result.
- Hard Mix – in each RGB channel, it adds the value of each pixel from the base layer to the active layer. If the sum for a channel equals or is greater than 255 it will display the maximum channel value. This result is binary, as channels whose sum is less than 255 won’t be displayed. It can only display white, black, red, green, blue, cyan, magenta and yellow.
Inversion – create negative-like effects by reversing the color and brightness values of pixels. Very useful when manually aligning layers.
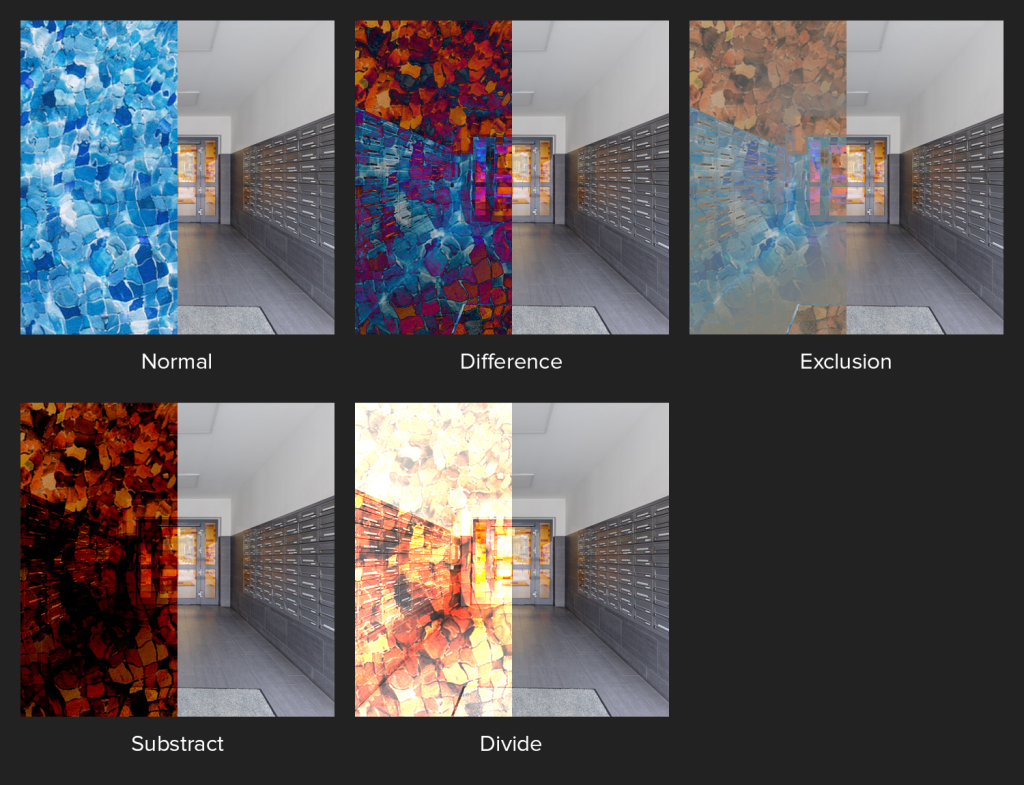
- Difference – subtracts pixels on the active layer from the base layer. It inverts colors based on pixel differences creating high contrast. Two overlapping pixels with the same values result in black, while blending with white will invert the value of the base layer.
- Exclusion – similar to the Difference blending mode but softens the contrast. Areas of 50% gray in the active layer will remain unchanged.
- Subtract – reduces pixel values leading to darker results, bright areas of the active layer will become dark.
- Divide – lightens the image by dividing pixel values, producing a bleaching effect.
Component – manipulate specific color components or channels of the image, allowing for precise adjustments
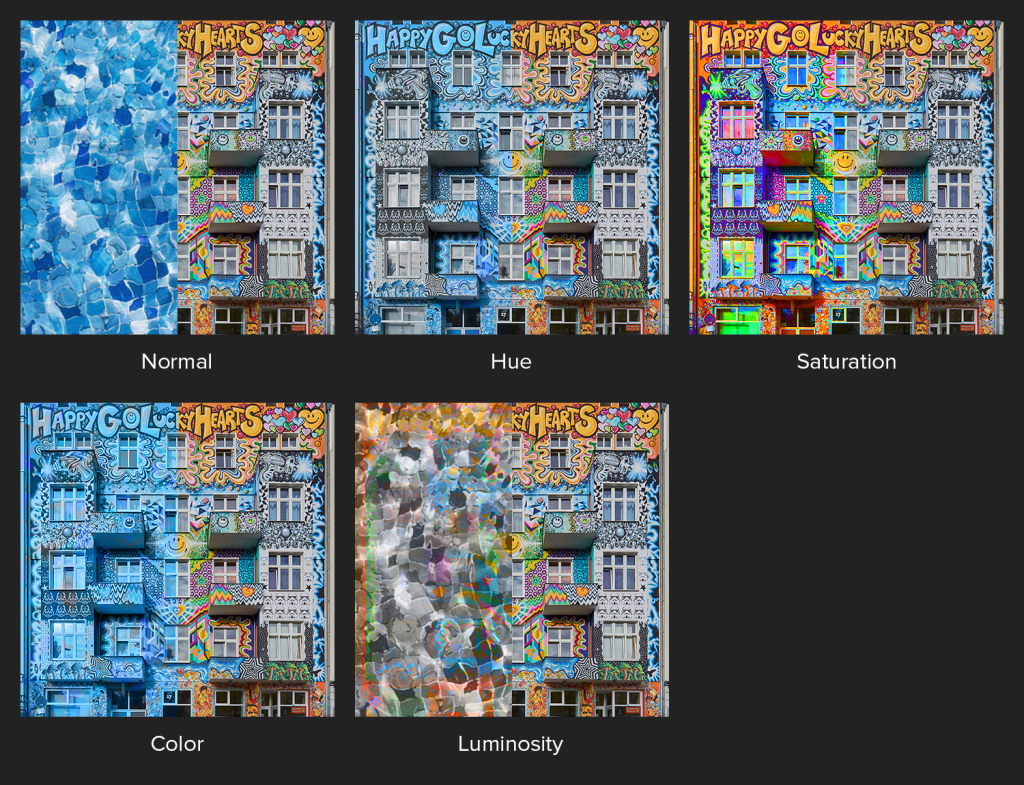
- Hue – applies the active layer’s hue while adopting luminosity and saturation from the base layer.
- Saturation – preserves the active layer’s saturation, incorporating hue and luminosity from the base layer.
- Color – retains both hue and saturation of the active layer, integrating only the base layer’s luminosity.
- Luminosity – maintains the active layer’s luminosity, blending in the hue and saturation components from the base layer.
When creating a group, its default blending mode is Pass Through, which allows the group to be used for organization because modifications and adjustments will appear merged. Changing the group’s blending mode will result in the effects being applied to the group as a whole, rather than allowing the layers inside the group to interact with layers outside of it.
When a blending mode is applied to a layer, it takes into account all the color information of the layers beneath it, treating them as a composite. This means the blending mode interacts with the combined color data of the underlying layers to produce a final visual effect.
A blending mode of a layer or group can be changed any time, making it non-destructive; it won’t alter the color information, as it will only change the visual output. However, changing a tool’s blending mode (for example changing a Brush from Normal to Darken) won’t alter the already-made adjustments, only subsequent uses.
Blend If
Blend If is a feature that allows precise control of layer blending based on the color information of the active and base layers. This function can be found in the Layer Style panel, which can be accessed by either double-clicking the area next to the layer name, right-clicking the layer and selecting Blending Options…, or selecting it from the fx options at the bottom of the Layers tab.
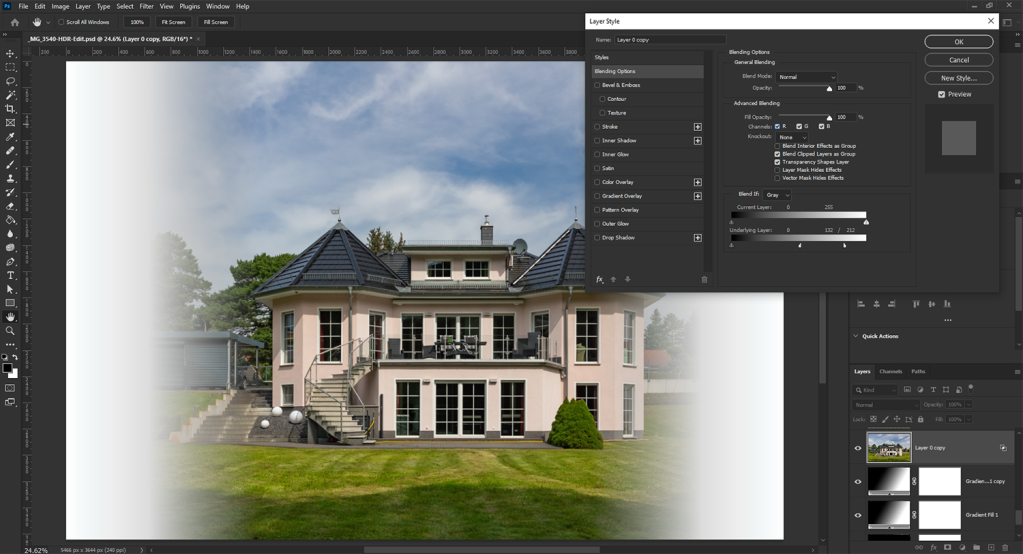
In the Advanced Blending section, the visibility of each channel can be controlled by checking and unchecking the RGB boxes in the Channels row. These settings strictly control the display information without influencing the Blend If calculations.
In the Blend If section, if Gray is selected, the sliders will work on the luminance levels of all RGB channels. However, if a specific channel is selected, the modifications will apply only to that channel.
The sliders refer to the active layer as Current Layer and the base layer as Underlying Layer. These sliders restrict the visibility of pixels based on luminosity. Adjusting the slider on the Current Layer limits the visibility of pixels across its luminosity spectrum. Adjusting the slider on the Underlying Layer determines where pixels from the active layer are visible, based on the luminance values of the base layer.
By alt-clicking (opt-clicking on Mac) and dragging the triangles, they can be split, resulting in smoother transitions between the visible and invisible areas.
Use cases for this feature include: texture control, isolating highlights and shadows, and compositing.
Tool-specific blending modes
Some tools in Photoshop offer additional blending modes, which can be selected from the active tool’s Options section under Mode. These blending modes are found in the Normal category, as they do not necessarily rely on calculations for their results, except Add, which is in the Inversion category.
- Replace – available only for the Healing Brush and the Spot Healing Brush, replaces the painted areas without blending their surrounding. The Diffusion option is disabled, as the brush functions similar to the Clone Stamp tool.
- Clear – available for all painting tools, except Gradient, it turns these into erasers as it deletes any brushed or filled pixels.
- Behind – available for painting tools and Clone Stamp, allows painting only on transparent pixels and doesn’t affect visible pixels.
- Add – is only available for the Calculations and Apply Image commands in the Image menu. It adds the color values of the two source layers or channels, offering the same results as the Linear Dodge (Add) blending mode. However, the Add blending mode provides additional control over the Scale and Offset of the result.
Cheat sheet
The following cheat sheet summarizes the information in this article and provides a detailed visual aid towards understanding blending modes.
